
Images: (1) Top left: Wormhole built using Python and Polyscope with its triangle mesh, (2) Top right: Wormhole with no mesh, (3) Bottom left: A concept of a wormhole (credits to: BBC Science Focus, https://www.sciencefocus.com/space/what-is-a-wormhole), (4) A cool accident: an uncomfortable restaurant booth.
During the intense educational week that is SGI’s tutorial week, we stumbled early on, on a challenge: creating our own mesh. A seemingly small exercise to teach us to build a simple mesh, turned for me into much more. I always liked open projects that speak to the creativity of students. Creating our own mesh could be turned into anything and our only limit is our imagination. Although the time was restrictive, I couldn’t but face the challenge. But what would I choose? Fun fact about me: in my studies I started as a physicist before I switched to be an electrical and computer engineer. But my fascination for physics has never faded, so when I thought of a wormhole I knew I had to build it.
From Wikipedia: A wormhole is a hypothetical structure connecting disparate points in spacetime and is based on a special solution of the Einstein field equations. A wormhole can be visualised as a tunnel with two ends at separate points in spacetime.
Well, I thought that it would be easier than it really was. It was daunting at first -and during the development I must confess-, but when I started to break the project into steps (first principles thinking), it felt more manageable. Let’s examine the steps on a high level/top-down:
1) build a semi-circle
2) extend its both ends with lines of the same length and parallel to each other
3) make the resulting shape 3D
4) make a hole in the middle of the planes
5) connect the holes via a cylinder
And now let’s explore the bottom-up approach:
1) calculate vertices
2) calculate faces
3) form quad faces to build the surfaces
4) holes are the absence of quad faces in predefined regions
I followed this simple blueprint and the wormhole started to take shape step by step. Instead of giving the details in a never-ending text, I opt to present a high-level algorithm and the GitHub repo of the implementation.

My inspiration for this project? Two-fold; stemming from the very first day of SGI. On one hand, professor Oded Stein encouraged us to be artistic, to create art via Geometry Processing. On the other, Dr. Qingnan Zhou from Adobe shared with us 3 practical tips for us geometry processing newbies:
1) Avoid using background colours, prefer white
2) Use shading
3) Try to become an expert in one of the many tools of Geometry Processing
Well, the third stuck with me, but -of course- I am not close to becoming a master of Python for Geometric Processing and Polyscope, yet. Though, I feel like I made significant strides with this project!
I hope that this work will inspire other students to seek open challenges and creative solutions or even build upon the wormhole, refine it or maybe add a spaceship passing through. Maybe a new SGI tradition? It’s up to you!
P.S. 1: The alignment of the shapes is a little bit overengineered :).
P.S. 2: Unfortunately, it was later in the tutorial week that I was introduced to the 3DXM virtual math museum. Instead of a cylinder, the wormhole should have been a Hyperbolic K=-1 Surface of Revolution, making the shape cleaner:
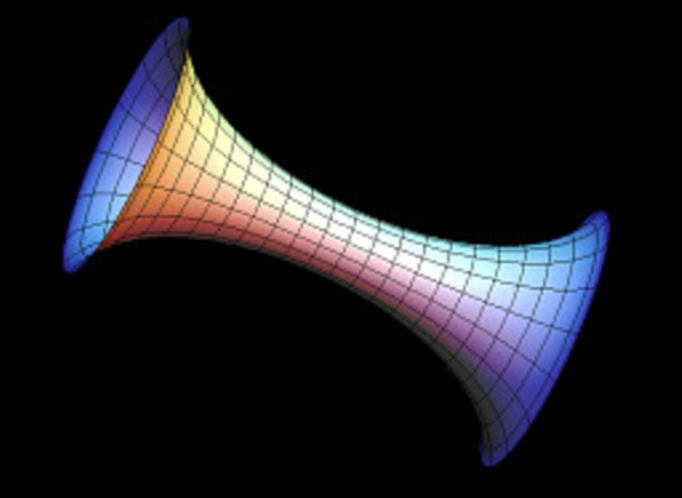
Image: Hyperbolic K=-1 Surface of Revolution.