Fellows: Aniket Rajnish, Ashlyn Lee, Megan Grosse, Taylor
Mentors: Ishit Mehta, Sina Nabizadeh
Repository: https://github.com/aniketrajnish/Redundant-SDFs
1.0 Problem Statement
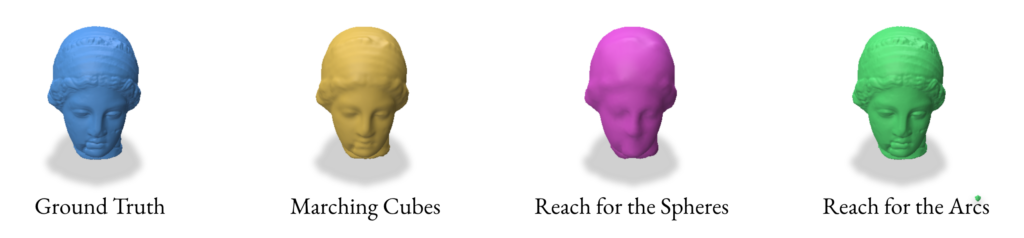
Signed Distance Functions (SDFs) are widely used in computer graphics for rendering and animation. They provide an implicit representation of shapes, which can be converted to explicit representations using methods such as Marching Cubes (MC) and, more recently, Reach for the Spheres (RfS) [Sellan et al. 2023]. However, as we will demonstrate later in this blog post, SDFs have certain limitations in representing various types of surfaces, which can affect the quality of the resulting explicit representations.
Vector Distance Functions (VDFs) [Gomes and Faugeras, 2003] offer a promising alternative, with the potential to overcome some of these limitations. VDFs extend the concept of SDFs by incorporating directional information, allowing for more accurate representation of complex geometries.
This study explores both SDF and VDF-based reconstruction methods, comparing their effectiveness and identifying scenarios where each approach excels. By examining these techniques in detail, we aim to provide insights into their respective strengths and weaknesses, guiding future applications in computer graphics and geometric modeling.
2.0 Reconstruction from SDF
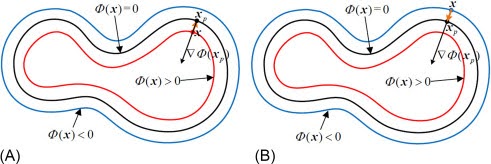
SDFs are one method of representing a surface implicitly. They involve assigning a scalar value to a set of points in a volume. The sign of the SDF value indicates whether the point is inside (-ve) or outside (+ve) the shape, while the magnitude represents the distance to the nearest point on the surface
Mathematically, an SDF \(f(x)\) for a surface \(S\) can be defined as:
$$
f(x) = \begin{cases} -\min_{y \in S} |x – y| & \text{if } x \text{ is inside } S\\
0 & \text{if } x \text{ is on } S\\
\min_{y \in S} |x – y| & \text{if } x \text{ is outside } S \end{cases}
$$
Where, \(|x-y|\) denotes the Euclidean distance between points \(x\) and \(y\).
2.1 Extracting SDF
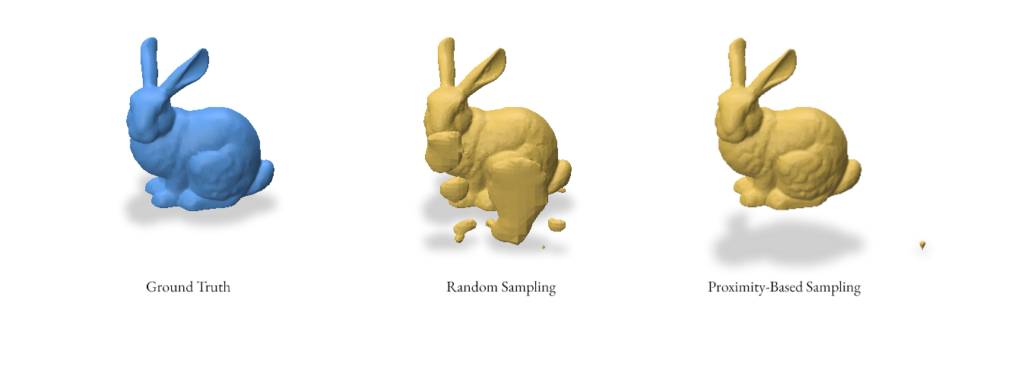
To reconstruct a surface from an SDF, we first need to obtain SDF values for a set of points in space. There are two main approaches we’ve implemented for sampling these points:
- Random Sampling – Generating uniformly distributed random points within a bounding box that encompasses the mesh. This ensures a broad coverage of the space but may miss fine details of the surface.
- Proximity-based Sampling – Generating points near the surface of the mesh. This method provides a higher density of samples near the surface, potentially capturing more detail. We implement this by first sampling the points and then adding Gaussian noise to these points.
def extract_sdf(sample_method: SampleMethod, mesh, num_samples=1250000, batch_size=50000, sigma=0.1):
    v, f = gpy.read_mesh(mesh)
    v = gpy.normalize_points(v)

    bbox_min = np.min(v, axis=0)
    bbox_max = np.max(v, axis=0)
    bbox_range = bbox_max - bbox_min
    pad = 0.1 * bbox_range
    q_min = bbox_min - pad
    q_max = bbox_max + pad

    if sample_method == SampleMethod.RANDOM:
        P = np.random.uniform(q_min, q_max, (num_samples, 3))
    elif sample_method == SampleMethod.PROXIMITY:
        P = gpy.random_points_on_mesh(v, f, num_samples)
        noise = np.random.normal(0, sigma * np.mean(bbox_range), P.shape)
        P += noise

    sdf, _, _ = gpy.signed_distance(P, v, f)

    return P, sdf
gpy.random_points_on_mesh() generates points on the mesh surface and gpy.signed_distance() computes the SDF values for the sampled points.
Here’s an example reconstruction using both random and proximity-based sampling for the bunny mesh using the Reach for the Arcs Algorithm:
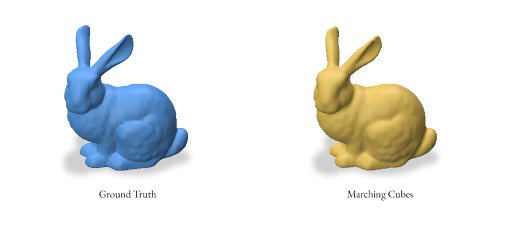
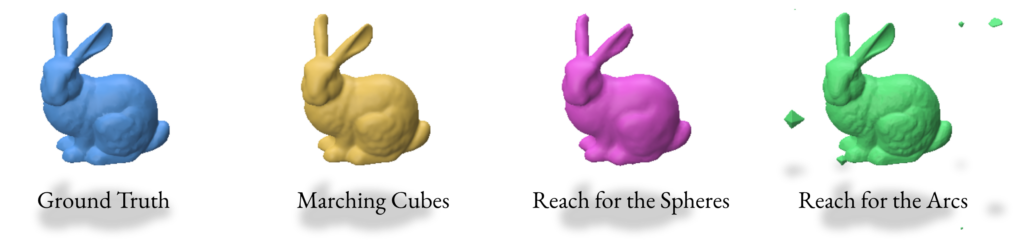
2.2 Reconstruction using Marching Cubes
Marching Cubes is a classic algorithm for extracting a polygonal mesh from an implicit function, such as an SDF. The algorithm works by dividing the space into a regular grid of cubes and then “marching” through these cubes to construct triangles that approximate the surface.
The key steps of the Marching Cubes algorithm are:
- Divide the 3D space into a regular grid of cubes.
- For each cube:
- Evaluate the SDF at each of the 8 vertices.
- Determine which edges of the cube intersect the surface (where the SDF changes sign).
- Calculate the exact intersection points on the edges using linear interpolation.
- Connect these intersection points to form triangles based on a predefined table of cases.
How we implement the marching cubes algorithm in our project:
def marching_cubes(self, grid_res=128):
    bbox_min = np.min(self.pts, axis=0)
    bbox_max = np.max(self.pts, axis=0)
    bbox_range = bbox_max - bbox_min
    bbox_min -= 0.1 * bbox_range
    bbox_max += 0.1 * bbox_range

    dims = (grid_res, grid_res, grid_res)
    x, y, z = np.meshgrid(
        np.linspace(bbox_min[0], bbox_max[0], dims[0]),
        np.linspace(bbox_min[1], bbox_max[1], dims[1]),
        np.linspace(bbox_min[2], bbox_max[2], dims[2]),
        indexing='ij'
    )

    grid_pts = np.column_stack((x.ravel(), y.ravel(), z.ravel()))
    self.grid_sdf = griddata(self.pts, self.sdf, grid_pts, method='linear', fill_value=np.max(self.sdf))
    self.grid_sdf = self.grid_sdf.reshape(dims)

    verts, faces, _, _ = measure.marching_cubes(self.grid_sdf, level=0)
    verts = verts * (bbox_max - bbox_min) / (np.array(dims) - 1) + bbox_min

    return verts, faces
In this implementation:
- We first define a bounding box that encompasses all sample points.
- We create a regular 3D grid within this bounding box.
- We interpolate SDF values onto this regular grid using
scipy.interpolate.griddata. - We use the
skimage.measure.marching_cubesfunction to perform the actual Marching Cubes algorithm. - Finally, we scale and translate the resulting vertices back to the original coordinate system.
The Marching Cubes algorithm uses a look-up table to determine how to triangulate each cube based on the sign of the SDF at its vertices. There are 256 possible configurations, which can be reduced to 15 unique cases due to symmetry.
One limitation of the Marching Cubes algorithm is that it can miss thin features or sharp edges due to the fixed grid resolution. Higher resolutions can capture more detail but at the cost of increased computation time and memory usage.
In the next sections, we’ll explore more advanced reconstruction techniques that aim to overcome some of these limitations.
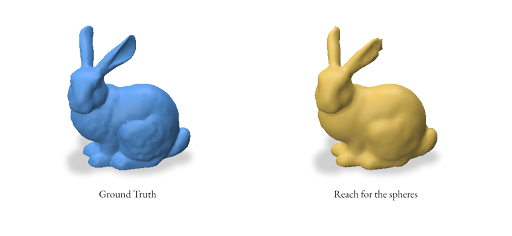
2.3 Reconstruction using Reach for the Spheres
Reach for the Spheres (RFS) is a surface reconstruction method introduced by Sellan et al. in 2023. Unlike Marching Cubes, which operates on a fixed grid, RFS iteratively refines an initial mesh to better approximate the surface represented by the SDF. The key idea behind RFS is to use local sphere approximations to guide the mesh refinement process.
The key steps of the RFS algorithm are:
- Start with an initial mesh (typically a low-resolution sphere).
- For each vertex in the mesh:
- Compute the local reach (maximum sphere radius that doesn’t intersect the surface elsewhere).
- Move the vertex to the center of this sphere.
- Refine the mesh by splitting long edges and collapsing short ones.
- Repeat steps 2-3 for a fixed number of iterations or until convergence.
For a vertex \(v\) and its normal \(n\), the local reach \(r\) is computed as:
$$
r = \arg\max_{r > 0} { \forall p \in \mathbb{R}^3 : |p – v| < r \Rightarrow f(p) > -r }
$$
Where \(f(p)\) is the SDF value at point \(p\). The new position of the vertex is then:
$$v_{new} = v + r \cdot n$$
How we implement the RFS algorithm in our project:
def reach_for_spheres(self, num_iters=5):
    v_init, f_init = gpy.icosphere(2)
    v_init = gpy.normalize_points(v_init)

    sdf_func = lambda x: griddata(self.pts, self.sdf, x, method='linear', fill_value=np.max(self.sdf))

    for _ in range(num_iters):
        v, f = gpy.reach_for_the_spheres(self.pts, sdf_func, v_init, f_init)
        v_init, f_init = v, f

    return v, f
In this implementation:
- We start with an initial icosphere mesh with the subdivision level set to 2 which gives us 162 vertices and 320 faces.
- We define an SDF function using interpolation from our sampled points.
- We iteratively apply the
reach_for_the_spheresfunction from thegpytoolboxlibrary. - The resulting vertices and faces are used as input for the next iteration.
Based on empirical observations, we’ve found that the best results are achieved when the number of faces and vertices in the initial icosphere is close to, but slightly less than, the expected output mesh complexity. Keeping it greater just simply results in the icosphere as the output.
| Subdivision Level (n) | Vertices | Faces |
| 0 | 12 | 20 |
| 1 | 42 | 80 |
| 2 | 162 | 320 |
| 3 | 642 | 1280 |
| 4 | 2562 | 5120 |
| 5 | 10242 | 20480 |
| 6 | 40962 | 81920 |
gpy.icosphere function.Advantages of RFS:
- Adaptive resolution: RFS naturally adapts to surface features, using smaller spheres in areas of high curvature and larger spheres in flatter regions.
- Feature preservation: The method is better at preserving sharp features compared to Marching Cubes
- Topology handling: RFS can handle complex topologies and thin features more effectively than grid-based method.
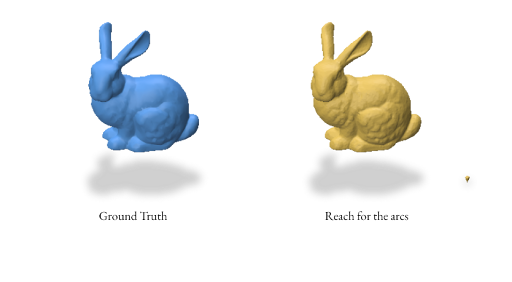
2.4 Reconstruction using Reach for the Arcs
When reconstructing a mesh with Reach for the Arcs (RFA), this algorithm allows us to generate a mesh from a signed distance function. This method is a sort of extension of Reach for the Spheres in the way that it is focused on the curvature of our initial mesh as the focus for the reconstruction. As mentioned in the paper, the run time is slower than reconstructing using Reach for the Sphere but it produces better outputs for closed surfaces with some curvature like spot and strawberry models in Section 2.5.
The key difference between RFA & RFS:
- Instead of spheres, we use circular arcs to approximate the local surface.
- The algorithm considers the principal curvatures of the surface when determining the arc parameters.
- RFA includes additional steps for handling thin features and self-intersections.
For a vertex \(v\) with normal \(n\) and principal curvatures \(\kappa_1\) and \(\kappa_2\), the local arc is defined by:
$$ v(t) = v + r(\cos(t) – 1)n + r\sin(t)d $$
Where \(r = 1/\max(|\kappa_1|, |\kappa_2|)\) is the arc radius, and \(d\) is the direction of maximum curvature.
How we implement the RFA algorithm in our project:
def reach_for_arcs(self, **kwargs):
    return gpy.reach_for_the_arcs(
        self.pts, self.sdf,
        rng_seed=kwargs.get('rng_seed', 3452),
        fine_tune_iters=kwargs.get('fine_tune_iters', 3),
        batch_size=kwargs.get('batch_size', 10000),
        screening_weight=kwargs.get('screening_weight', 10.0),
        local_search_iters=kwargs.get('local_search_iters', 20),
        local_search_t=kwargs.get('local_search_t', 0.01),
        tol=kwargs.get('tol', 0.0001)
    )
This implementation uses the reach_for_the_arcs function from the gpytoolbox library. The key parameters are:
fine_tune_iters: Number of iterations for fine-tuning the meshbatch_size: Number of points to process in each batchscreening_weight: Weight for the screening term in the optimizationlocal_search_itersandlocal_search_t: Parameters for the local search step.
Advantages of RFA:
- Improved handling of high curvature: The use of arcs allows for better approximation of highly curved surfaces.
- Better preservation of thin features: RFA includes specific steps to handle thin features that might be missed by RFS.
- Reduced self-intersections: The algorithm includes checks to prevent self-intersections in the reconstructed mesh.
2.5 Validation of SDF reconstruction methods
For the validation we used the following params while performing the SDF based reconstruction:
- SDF Computation
- Method:
SDFMethod.SAMPLE(sampling points) - Sampling Method:
SampleMethod.PROXIMITY(sample points around the mesh surface) - Batch Size: 50000 (earlier we were extracting SDF in batches)
- Sigma: 0.1 (for gaussian noise)
- Method:
- Marching Cubes
- Grid resolution: 128 x 128 x 128
- Reach for The Spheres
- Number of Iterations: 10
- Initial mesh: Icosphere with subdivision level 4 (2562 verts & 5120 faces)
- Reach for The Arcs
- Fine-tune iterations: 3
- Batch size: 10,000
- Screening weight: 10
- Local search iterations: 20
- Local search step size: 0.01
- Tolerance: 0.0001


3.0 Reconstruction using VDF (Vector Distance Functions)
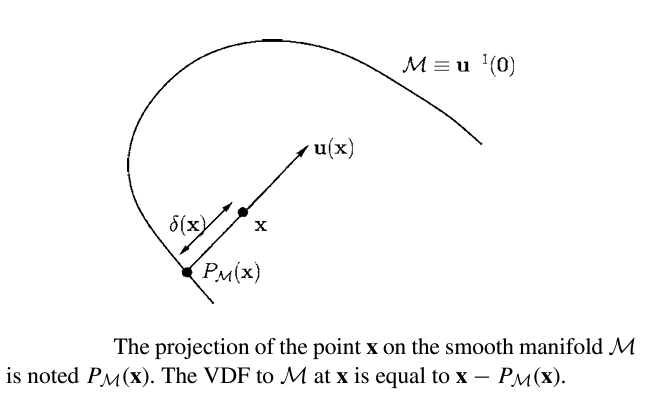
Reconstructions using Vector Distance Functions (VDFs) are similar to those using SDFs, except we have added a directional component. After creating a grid of points in a space, we can construct a vector stemming from each point that is both pointing in the direction that minimizes the distance to the mesh, as well as has the magnitude of the SDF at that point. In this way, the tip of each vector will lie on the real surface. From here, we can extract a point cloud of points on the surface and implement a reconstruction method.
Mathematically, VDF can be used for arbitrary smooth maniform \(M\) with \(k\) dimension.
The following proof is from Gomes and Faugeras’ 2003 paper:
Given a smooth manifold \(M\), which is a subset of \(\mathbb{R}^n\), for every point \(x\), \(\delta(x)\) is that distance of \(\textbf{x}\) to \(M\). Let \(\textbf{u(x)}\) be the vector length of \(\delta(x)\), since \(u(x) = \delta{(x)}D\delta{(x)}\) for \(||D\delta{x}||\)=1. At a point \(\textbf{x}\) where \(\delta \) is differeientable, let \(\textbf{y} = P_{M}(x)\) be an unique projection of \(\textbf{x}\) onto \(M\). This point is such that \(\delta(x) = || x-y||\). Assuming \(M\) is smooth at \(y\), \(\textbf{x-y}\) is normal to \(M\) and parallel to \(D\delta{(x)}\).
Thus:
$$
\textbf{u(x)}= \textbf{x-y}= x-P_{M}(x)
$$
Advantages of VDFs:
Due to their directional nature, VDFs have the potential to have more versatility and accuracy compared to SDFs.
There are four main benefits of using VDFs instead of SDFs:
- VDFs can be used with shapes with arbitrary codimension.
- VDFs perform better mesh reconstruction for closed surfaces.
- VDFs can represent open surfaces that SDFs cannot.
- VDFs can represent non-manifold surfaces like a Möbius strip.
Disadvantages of VDFs:
Despite these advantages, VDFs do have some drawbacks:
- VDFs require more information to be known compared to SDFs
- SDFs only need one number (distance) associated with each point in the grid
- VDFs, on the other hand, require three numbers (assuming a 3D grid) associated with each point, representing the x, y, and z directions associated with each vector
- VDFs can be harder to visualize/debug compared to SDFs
- Depending on the method used to obtain them, VDFs can be inaccurate at some grid points
- For example, singularities in the gradient can create issues when attempting to use the gradient for a VDF
- These inaccurate VDFs can create inaccurate point clouds, which can result in poor reconstructions
Now, we will discuss the methods we used for creating VDFs and using them for reconstructions.
3.1 Reconstruction using Gradient
The gradient-based method leverages the fact that the gradient of a Signed Distance Function (SDF) points in the direction of maximum increase in distance. By reversing this direction and scaling by the SDF value, we obtain vectors pointing towards the surface.
Given an SDF \(\phi(x)\), the VDF \(\mathbf{u}(x)\) is defined as:
$$ \mathbf{u}(x) = -\phi(x) \frac{\nabla \phi(x)}{|\nabla \phi(x)|} $$
Where \(\nabla \phi(x)\) is the gradient of the SDF at point \(x\).
Implementation:
def compute_gradient(self):
    def finite_difference(f, axis):
        f_pos = np.roll(f, shift=-1, axis=axis)
        f_neg = np.roll(f, shift=1, axis=axis)
        f_pos[0] = f[0]  # neumann boundary condition
        f_neg[-1] = f[-1]
        return (f_pos - f_neg) / 2.0

    distance_grid = self.signed_distance.reshape(self.grid_shape)
    gradients = np.zeros((np.prod(self.grid_shape), 3))
    for dim in range(3):
        grad = finite_difference(distance_grid, axis=dim).flatten()
        gradients[:, dim] = grad

    magnitudes = np.linalg.norm(gradients, axis=1, keepdims=True)
    magnitudes = np.clip(magnitudes, a_min=1e-10, a_max=None)
    normalized_gradients = gradients / magnitudes

    signed_distance_reshaped = self.signed_distance.reshape(-1, 1)
    self.vector_distance = -1 * normalized_gradients * signed_distance_reshaped
    self.vector_distance[:, [0, 1, 2]] = self.vector_distance[:, [1, 0, 2]]

def compute_surface_points(self):
    self.vdf_pts = self.grid_vertices + self.vector_distance * self.signed_distance.reshape(-1, 1)
This method computes gradients using finite differences, normalizes them, and then scales by the SDF value to obtain the VDF. The surface points are then computed by adding the VDF to the grid vertices.
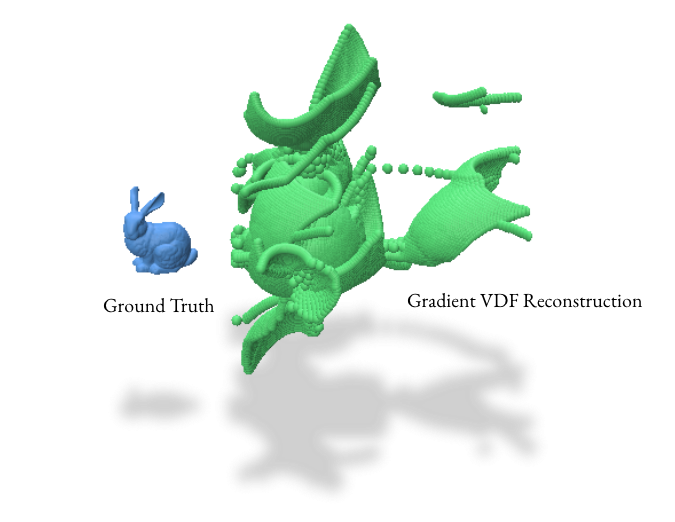
However, the gradient VDF reconstruction method, while theoretically sound, presented significant practical challenges in our experiments. As evident in the image above, this method produced numerous artifacts and distortions:.These issues likely arise from singularities and numerical instabilities in the gradient field, especially in complex geometries.
Given these results, we opted to focus on the barycentric coordinate method for our VDF reconstructions. This approach proved more robust and reliable, especially for complex 3D models with intricate surface details.
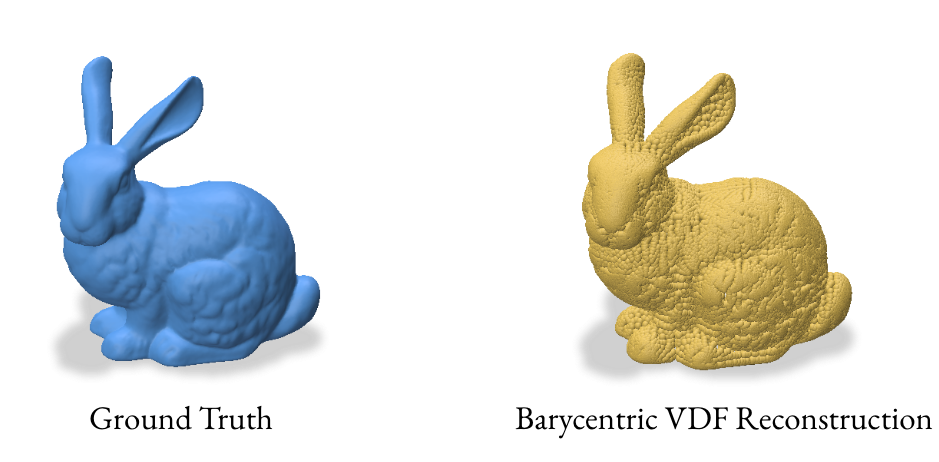
3.2 Reconstruction using Barycentric Coordinates
The barycentric coordinate method utilizes the signed_distance function from gpytoolbox to find the closest points on the mesh for each grid point. These closest points, represented in barycentric coordinates, are then converted to Cartesian coordinates to form a point cloud.
For a point \(p\) with barycentric coordinates \((u, v, w)\) relative to a triangle with vertices \((v_1, v_2, v_3)\), the Cartesian coordinates are:
$$ p = u v_1 + v v_2 + w v_3 $$
Implementation:
def compute_barycentric(self):
    self.signed_distance, self.face_indices, self.barycentric_coords = gpy.signed_distance(self.grid_vertices, self.V, self.F)
    self.vdf_pts = self.barycentric_to_cartesian()
    self.vector_distance = self.grid_vertices - self.vdf_pts
    magnitudes = np.linalg.norm(self.vector_distance, axis=1, keepdims=True)
    self.vector_distance = self.vector_distance / magnitudes

def barycentric_to_cartesian(self):
    cartesian_coords = np.zeros((self.barycentric_coords.shape[0], 3))
    face_vertex_coordinates = self.V[self.F[self.face_indices]]
    for i, (bary_coords, face_vertices) in enumerate(zip(self.barycentric_coords, face_vertex_coordinates)):
        cartesian_coords[i] = np.dot(bary_coords, face_vertices)
    return cartesian_coords
This method computes the closest points on the mesh for each grid point and converts them to Cartesian coordinates. The VDF is then computed as the normalized vector from the grid point to its closest point on the mesh.
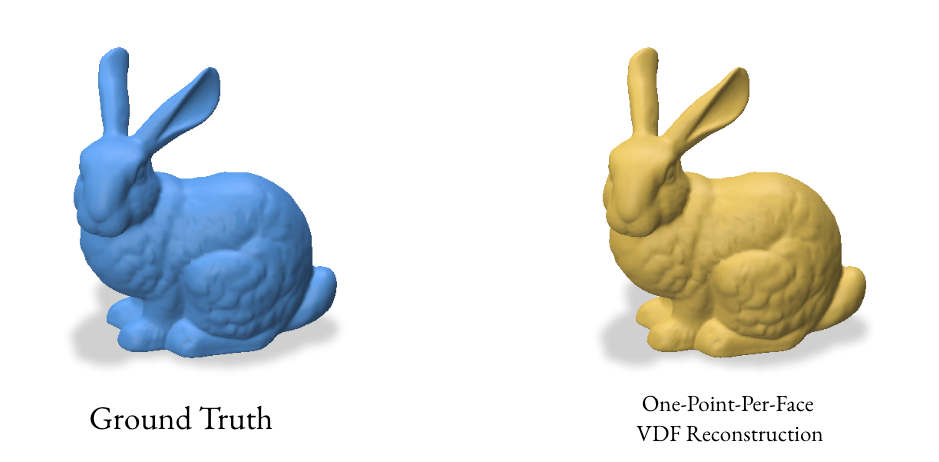
3.3 Reconstruction using one point per face
The one-point-per-face method aims to create a more uniform distribution of points on the surface by using the centroid of each face as a sample point. This approach is particularly effective for meshes with similarly-sized faces.
For a triangle face with vertices \((v_1, v_2, v_3)\), the centroid \(c\) is:
$$ c = \frac{v_1 + v_2 + v_3}{3} $$
The normal vector \(\mathbf{n}\) for the face is:
$$ \mathbf{n} = \frac{(v_2 – v_1) \times (v_3 – v_1)}{|(v_2 – v_1) \times (v_3 – v_1)|} $$
Implementation:
def compute_centroid_normal(self):
    print('Computing centroid-normal reconstruction...')

    def compute_triangle_centroids(vertices, faces):
        return np.mean(vertices[faces], axis=1)

    def compute_face_normals(vertices, faces):
        v0, v1, v2 = vertices[faces[:, 0]], vertices[faces[:, 1]], vertices[faces[:, 2]]
        normals = np.cross(v1 - v0, v2 - v0)
        return normals / np.linalg.norm(normals, axis=1, keepdims=True)

    centroids = compute_triangle_centroids(self.V, self.F)
    normals = compute_face_normals(self.V, self.F)

    # Double-sided representation
    self.vdf_pts = np.concatenate((centroids, centroids), axis=0)
    self.vector_distance = np.concatenate((normals, -1 * normals), axis=0)
This method computes the centroids and normals for each face of the mesh. It creates a double-sided representation by duplicating the centroids and flipping the normals, which can help in creating a watertight reconstruction.
4.0 Analyzing the Results
After performing various reconstruction methods using Signed Distance Functions (SDFs) and Vector Distance Functions (VDFs), it’s crucial to analyze and compare the results. This section covers the visualization, and quantitative evaluation of the reconstructed meshes.
4.1 Visualizing the Results
The project uses the Polyscope library for visualizing the original and reconstructed meshes. The visualize method in all SDFReconstructor, VDFReconstructor and RayReconstructor classes handles the visualization.
This method creates a visual comparison between the original mesh and the reconstructed meshes or point clouds from different methods. The meshes are positioned side by side for easy comparison.
Additionally, the project includes a rendering functionality to export the visualization results as images. This is implemented in the render.py file
4.2 Fitness Score using Chamfer Distance
The project uses the Chamfer distance to compute a fitness score for the reconstructed meshes. The implementation is in the fitness.py file.
The Chamfer distance measures the average nearest-neighbor distance between two point sets. The fitness score is computed as:
$$\text{Fitness} = \frac{1}{1 + \text{Chamfer distance}}$$
This results in a value between 0 and 1, where higher values indicate better reconstruction.
5.0 Some Naive experimentation to get the results
Our initial experiments with the gradient VDF method produced unexpected results due to singularities, leading to inaccurate point clouds. This prompted us to explore alternative VDF methods that directly sample points on the surface, resulting in more reliable reconstructions.
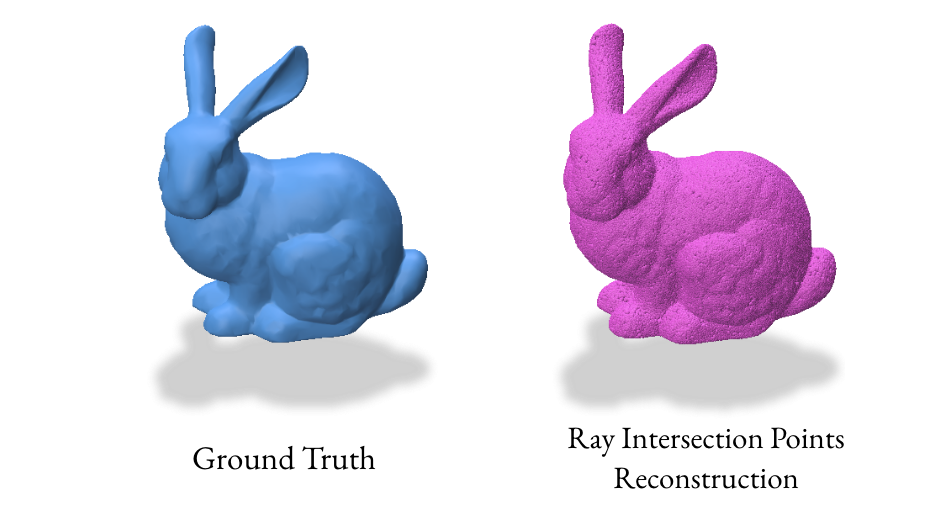
We implemented a ray-based reconstruction technique, the RayReconstructor class, as an additional method. This method generates a point cloud by shooting random rays and finding their intersections with the surface, then uses Poisson Surface Reconstruction to create the final mesh.
6.0 Takeaways & Further Exploration
Overall, VDFs are a promising alternative to SDFs and with the correct reconstruction method, can provide almost identical resultant meshes. They are able to provide more detail at the same resolution when compared to Marching Cubes and Reach for the Spheres. While Reach for the Arcs gives an impressive amount of detail, it often adds too much detail to where it results in details that are not present in the original mesh. VDFs, when constructed/used correctly, do not have this problem. If time permitted, we would have experimented with more non-manifold surfaces and compared the results of SDF and VDF reconstructions of these surfaces. VDFs do not require a clear outside and inside like SDFs do, so we could also explore more such surfaces manifold and non-manifold alike.
References
William E. Lorensen and Harvey E. Cline. 1987. Marching cubes: A high resolution 3D surface construction algorithm. SIGGRAPH Comput. Graph. 21, 4 (July 1987), 163–169. https://doi.org/10.11enecccevitchejdkevcjvrgvjhjhhkgcbggtkhtl45/37402.37422
Silvia Sellán, Christopher Batty, and Oded Stein. 2023. Reach For the Spheres: Tangency-aware surface reconstruction of SDFs. In SIGGRAPH Asia 2023 Conference Papers (SA ’23). Association for Computing Machinery, New York, NY, USA, Article 73, 1–11.
https://doi.org/10.1145/3610548.3618196
Silvia Sellán, Yingying Ren, Christopher Batty, and Oded Stein. 2024. Reach for the Arcs: Reconstructing Surfaces from SDFs via Tangent Points. In ACM SIGGRAPH 2024 Conference Papers (SIGGRAPH ’24). Association for Computing Machinery, New York, NY, USA, Article 23, 1–12.
https://doi.org/10.1145/3641519.3657419
José Gomes and Olivier Faugeras. The Vector Distance Functions. International Journal of Computer Vision, vol. 52, no. 2–3, 2003.
https://doi.org/10.1023/A:1022956108418